I found this lovely crochet pattern out there from Notes nastolatki. The author of this post has loveingly written the instructions out in both Polish and English. I don't want to steal their pattern so I'll just link it instead. I will detail what changes I did make instead though.
Materials I used
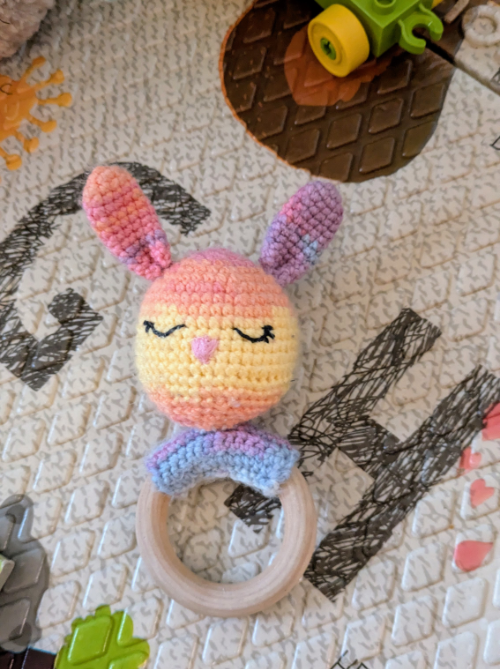
Instead of using simple natural colors, I opted to go for a wild, fun color. I chose yarn in a similar weight that was multicolored. The caveat being with this choice that the thread I use to sew the pieces together may be more obvious.
I also opted to use the rattler, but if you aren't a fan of rattlers you can easily omit.
- Yarn: I used Lion Heart Ice cream which is a DK (3-weight) yarn. The color pictured is "Parfait". You can get this yarn as a 6-pack on Amazon
- Wooden ring: 2.7 inch birch wooden rings on Amazon
- Rattler: 10 piece rattle balls on Amazon
Tools
I used a 2.5mm hook (also available on Amazon) for this project. I chose this size hook to compensate for slightly thicker yarn.
I also often use yarn needles to weave in ends and help sew the pieces together. Just for good measure I also ususally sew with good ol' needle and thread.
Alterations & pattern notes
The pattern is pretty simple. It consists of a crochet ball with an optional rattler inside, two flat tubes curled at one end for the ears and then a crochet rectangle to wrap around the wooden ring.
The head
The head/ball is pretty straight forward. It's a ball, worked in the round. I did use hidden decreasing single crochets when I was working. I much prefer using hidden decreases over decreases. I'll have to write a blog on that discinction later, but the jist is a hidden decreasing stitch is the same as a decrease, but worked in front loops only. The idea being that the back loop remains in place to help visually cover any gaps created by pulling and working two stiches together.
The ears
I made no alterations here.
The ring wrap
The part of the pattern that wrapps around the ring is a bit scant in details so I'll share what I did here.
I followed the starting number of rows, but made had to make twice the number of rows to get around the ring. I folded my yarn over it horizontally.